Monday, June 04, 2007

Mustard

I read a bunch of mustard recipes and history stuff on mustard. I read bunches of websites. I cracked open the books. For those of you who do not know about medieval mustards, just start here: http://www.gallowglass.org/jadwiga/herbs/Mustards.html That will save you an immense amount of time.

The Recipes:

A French Mustard:


From Coquinaria:
http://www.coquinaria.nl/english/recipes/03.1histrecept.htm
Moustarde. Se vous voulez faire provision de moustarde pour garder longuement, faictes la en vendenges de moulx doulx. Et aucuns dient que le moulx soit bouly. Item, se vous voulez faire moustarde en ung village a haste, broiez du senevé en ung mortier et deffaictes de vinaigre, et coulez par l'estamine. Et se vous la voulez tantost faire parer, mectez la en ung pot devant le feu. Item, et se vous la voulez faire bonne et a loisir, mectez le senevé tremper par une nuyt en bon vinaigre, puis la faictes bien broyer au moulin, et bien petit a petit destremper de vinaigre. Et se vous avez des espices qui soient de remenant de gelee, de claré, d'ypocras ou de saulses, si soyent broyez avec et après la laisser parer.

Mustard. If you want to make a supply of mustard that will keep long, make it during the picking-season (of wine grapes) from fresh stum. Some say the stum must be boiled.
Item if you want to make mustard in a village (where there is no stum) in a hurry, grind white mustard[seeds] in a mortar, mix with vinagre, and strain through the sieve. When you want to use it immediately, put it in a pot near the fire.
Item if you want to make good [mustard] at leasure, soak the mustard seeds during one night in fine vinagre, then grind in the mill, and mix in the vinagre gradually. When you have spices left over from making jelly, claret, hypocras or sauces, grind these with [the mustard seeds] and let it mature.

Hypocras:

Pour faire ung lot de bon ypocras. Prenes une onches de cinamonde nommée longue canelle en pippe, avec unes cloche de gingembre et autant de garingal, bien estampé ensemble, et puis prenez ung livre de bon çuquere: et tout cela broyés ensamble et destrempés avec ung lot du milleur vin de Beaune que pourrés finer et le laissir tremper ungne heure ou deux. Et pus coullés parmy ung chause par plusieurs fois tant qui soit bien cler.

To make a lot (=liquid measure) fine hypocras. Take one ounce cinnamon called long cinnamon in sticks, with some pieces of ginger and as much galanga, grind well together. Have a pound of fine sugar, and grind together and mix with a lot of the best wine of Beaune you can get and let this stand for one or two hours. Then let it run through a sack several times until it is clear.

250 gram white or black mustard seeds, or some of both
4 decilitre white wine vinagre of good quality
1 teaspoon mixed spices
salt


My estimates:

1 ½ cup mustard seeds,
1 3/4 cups port wine vinegar
1 teaspoon mixed spices
dash salt

The Instructions:
Preparation in advance: Since must or stum (the freshly pressed juice of winegrapes about to ferment) is available only in wine-countries in octobre, we make the mustard with wine vinagre. Let the mustard seeds soak during the night in white wine vinagre, The vinaigre should stand about 2 centimeters above the seeds.

Preparation: The next morning the mustard seeds have absorbed the vinagre, and become soft (you can crush them between your fingers). Mash them in a blender, and add as much vinagre as is needed to obtain the desired thickness. Add salt and spices. Taste it, be sure there is enough salt in it.
Keep the mustard in a well closing container in the refrigerator during at least eight days, to let the taste mature.
To serve: In small dishes on the table.

My Interpretation:
I used the last part of the recipe, which is underlined in the above quotes from the website. I do not speak French, so I used that translation. I used the following proportions:
¼ cup mustard seeds,
1/3 cups port wine vinegar
¼ teaspoon mixed spices
dash salt

I elected to use the port vinegar because ultra sweet wines were extremely popular in period and I had a fabulous bottle of old zinfandel port wine vinegar. The original author suggested white wine vinegar. I did not see any high quality white wine vinegar at my local market. There were champagnes, ports, balsamics and then very cheap white wine vinegar. This means there will be a significant difference in appearance. I think this would be a matter of preference in the middle ages and availability. Vinegar done with skill is as finicky and artistic as wine.

I soaked the seeds in the port wine vinegar in a plastic container. I didn’t have any canning jars ready. The next day, I added the spices and use the blender to chop things up. This is the hottest mustard I have ever tasted. Ever. By the way, a blender is a reasonable replacement for a stone grinder and 10 kitchen helpers. I decided.

After I made this mustard, my son who is a sous chef 'borrowed' it for the base for a sauce he made. He added a touch of commercial brown mustard. He then served it with a pot roast that was falling apart tender. It was fabulous. He also offered some good criticisms about the redaction.

Lombard Mustard:

From the Forme of Cury:
Lombard Mustard
Take Mustard seed and waishe it & drye it in an ovene, grynde it drye, farce it through a farce, clarifie honey wt wine & vinegr & stere it wel togedr, and make it thikke ynowe, & whan thou wilt spende thereof make it thynne wt wine.
http://www.pbm.com/~lindahl/foc/FoC108small.html

This is a particularly interesting recipe and I have seen it done about 6 different redactions. None of them was remotely close to the other so I decided to do my own. Why not? The process of washing, drying in an oven and grinding dry mustard seed and forcing it through a horse hair sieve leaves you with something theoretically similar to Coleman's mustard powder, but with the color of your original seeds. I will be testing that later. In this case, mustard powder did not stand up to the port wine vinegar. The color of the mustard is a medium brown:

1/4 cup mustard powder, either processed or ground and sifted seeds
1/2 cup port wine vinegar
1/4 cup wine (for thinning)
1/4 cup of honey

I combined my mustard powder and vinegar and let it sit over night. That is pretty common with mustard making in general. This is also pungent. It is eye watering the next day. Slowly stir in the honey and thin with wine. I just put it in the mustard crock. It is tasty, but has more heat and less vinegar taste than modern commercial honey mustard. Mustard is highly competitive, so it wouldn't surprise me that people are being trained to like a higher vinegar content.

My theory is that the vinegar content wasn't as high in period. I think mustard was one of the truly hot spices. There were fewer hot spices and ginger, mustard and peppercorns stepped in to fill the fire void. In our modern spice cabinet we have various
Capsicum annuum (chili powder, cajun spices, paprika, hot chili peppers, pepper flakes and sweet bell peppers.) We also have vanilla and allspice, but the important thing here is the desire for hotness. There are people who adore hot tastes. We eat salsa, spicy burritos, Thai food and Chinese foods for a reason. That hotness is great.

So far, everything was done with yellow mustard seeds which are the lowest quality according to the grandmas I know. Black or brown is the best.

Cordials, Walnuts, Syrups, Pastes and Mustard


I have been learning to work with green walnuts. I threw a note out there on the kingdom list and a few weeks later, Mistress Juana answered it with some suggestions. It reminded me on just the right day to look for green walnuts. They were on my two trees and they were about the size of a ping pong ball. I did some research on green walnuts and it started with http://www.sfgate.com/cgi-bin/article.cgi?file=/chronicle/archive/2004/05/20/WIG346O0371.DTL

The article is a modern food article, but I could not help feeling that there was something medieval about it. I am still looking for information stating that any of the three recipes is medieval. Orahovac may be, as that is an area in Croatia that means 'walnut'. So far, nothing though.

I made the Orahovac and Noccino just the way they are in the article. I have the Vin de Noix waiting. 40 days! Anyhow, if anyone has information on these being known in period, please drop me a line.

What I did find that was period was a mention of pickled walnuts and green walnut paste in Perry's translation of An Anonymous Andalusian Cookbook of the 13th century.


Green Walnut Paste

Take a ratl of green walnuts and pierce them well with an iron skewer, then steep them in water for three days; take them out of the water and for each ratl take three of honey, cleaned of its foam, after cooking the nuts a little. Take them from the water and return them to the honey, and cook them until they take the form of a paste. Season with cinnamon, cloves, and ginger, three quarters of an ûqiya for each ratl, and eat it after meals. Its benefits: it excites the appetite and digests foods, heats the kidneys, and increases urine. http://daviddfriedman.com/Medieval/Cookbooks/Andalusian/andalusian10.htm#Heading520

The first thing I did was see that this is a basic one part to three parts recipe. A ratl is roughly a pound and an ûqiya is one twelfth of a pound.

Green Walnut Paste Redaction
1 lbs of green walnuts
3 lbs of honey, clarified
1 ounce of spice blend

Using rubber gloves to protect your hands from stains, pierce the nuts all over with a skewer. Soak the walnuts in water for 3 days. Boil the nuts in their own water for about 45 minutes. In a separate pot, bring the honey to a strong simmer and skim it. Stir the spices into the honey. Strain the walnuts and add them to honey. Simmer this until the mixture becomes reduced and gooey. I reduced it by 3/4 and took it to the soft ball stage on my candy thermometer.

An ounce of cinnamon is about 4 and a half tablespoons. Cloves have about the same weight. I decided to fool around with the spices a bit. The recipe calls for
cinnamon, cloves, and ginger. This could be a pretty deadly combination if you tried something like equal parts. Cloves have an exceptionally strong flavor so I decided to take a look at spices for similar things that may not be period, but are from that area. The older the better. There was a trend to using a smaller portion of cloves to the other spices. I didn't see anything that called for equal parts of cinnamon, clove and ginger. I was also going to use fresh ginger for this. I think you can make the case for dry or fresh ginger. In my case, I had fresh ginger that needed to be use and I love fresh ginger. I used 3/4 ounce of fresh ginger, which was about a tablespoon and a half. Then I used 1 tablespoon of cinnamon and 1/2 teaspoon of cloves.

I have no clue if I did this right. I did two variations. One, I left the walnuts whole and one I put through the food processor. I did this because of the carrot paste recipe. I also love the idea of serving someone black gunk and then calling it something that is good for increasing urine. Plus, it is green walnuts. How cool is that?? I am waiting for the whole ones to firm up but the paste ones taste pretty good.

Pickled walnuts: I used http://www.davidgregory.org/pickled_walnuts.htm to start my recipe. Most of the recipes were similar, and I like the brining of the walnuts. Those are sitting in a jar, brining themselves away.

Cordials: When it came to cordials and syrups I went nuts. I was seriously considering chopping down my lemon tree. I love my lemon tree. I decided not to chop it down just now, but I was pushing to get all the lemons off. I made 14 quarts of lemon drop and 14 of limoncella.

Syrups: Here was a place where I had fun. I made three from Perry's Andalusian translation and one of my own device.

Syrup of Simple Sikanjabîn (Oxymel)

Take a ratl of strong vinegar and mix it with two ratls of sugar, and cook all this until it takes the form of a syrup. Drink an ûqiya of this with three of hot water when fasting: it is beneficial for fevers of jaundice, and calms jaundice and cuts the thirst, since sikanjabîn syrup is beneficial in phlegmatic fevers: make it with six ûqiyas of sour vinegar for a ratl of honey and it is admirable.
...[gap: top third of this page has been cut off]...
... and a ratl of sugar; cook all this until it takes the consistency of syrup. Its benefit is to relax the bowels and cut the thirst and vomiting, and it is beneficial in bilious fevers http://daviddfriedman.com/Medieval/Cookbooks/Andalusian/andalusian10.htm#Heading497

This is a pretty simple syrup. I had some old vine zinfindel port vinegar. Old Vine Zinfindel ports are all the rage, or were about 5 years ago. I would imagine (due to the pretty shoddy labels) that someone botched a large batch of wine. The vinegar is good, but not outstanding as it should be. I have a Praeger port vinegar that is fabulous. I didn't mind devoting my very nice other brand vinegar to making this, but not my Praeger. I measured the vinegar and found I had 3 cups. I set aside one cup for my mustard project and set up two separate pots. In the first pot I put 1 cup of the vinegar and 2 cups of sugar. I did the same thing with the other pot. Then I picked about six handfuls of mint. (I pulled it up because it was crowding my daisies.) I cleaned the mint and put it in the boiling syrup for about 3-4 minutes. Then I strained the syrup into a canning jar. The minty version is rich but not overwhelmingly minty. It also does not have the slightly bitter or grassy aftertaste of overcooked mint.

I got caught up in the cookbook and decided to make the tamarind, lemon and carrot syrups. I really wanted to make violet syrup, but I have no violets. I got some today and planted them in the front yard.

Syrup of Lemon

Take lemon, after peeling its outer skin, press it and take a ratl of juice, and add as much of sugar. Cook it until it takes the form of a syrup. Its advantages are for the heat of bile; it cuts the thirst and binds the bowels.

My version:

4 cups of juice from lemon flesh only

8 cups of sugar.

Bring slowly to a boil and keep it there until it turns to a syrup. Over cooking it will turn it to jelly.


I took my lemons and peeled them with a vegetable peeler. Then I cut off the pith. I did this so I would have lemon peel for the limoncella. The pith is bitter, so it should be discarded. This recipe I interpreted literally. I pressed the juice out of the flesh and tried it in comparison to the juice of a lemon from an unpeeled half of a lemon. I think it does make a slight difference, if you are very sensitive to the taste. There is a hint of the oil in rind on juice and I don't think it was as sweet. Anton and Collect came over and tried it and they thought it was a lot like non-alcoholic Mike's Hard Lemonade.

Syrup of Carrots

Take four ratls of carrots, after removing the fibers [lit. "nerves"] that are in the centers, and cook them in water to cover until their substance comes out. Then take the clear part of it and add it to three ratls of honey, cleaned of its foam. The bag: ...[about three words missing]... an ûqiya of cubebs, two ûqiyas each of ginger and long pepper, and half an ûqiya of cinnamon and flower of cloves. Cook until it takes the form of a syrup. Drink an ûqiya of this with three of hot water: it is beneficial in the lack of urine, increases desire, and dissolves phlegm, heats the kidneys admirably, and likewise the other parts of the body, God willing.

Carrot Syrup

4lbs carrots, sliced
3lbs honey
1
tablespoons cubebs
3
tablespoons ginger
2 tablespoons long pepper
1
tablespoon cinnamon
10 cloves

I boiled the carrots in water that covered them by about an inch. I simmered it for an hour or until the carrots barely could hold their shape.

I wanted my liquid to be tinted a little, but very carrot flavored. I also used stronger flavored white and red carrots. This choice was made because even though Persian farming techniques which would have produced a sweeter carrot through irrigation, I felt that the stronger flavored carrots were necessary. The sweet, coreless carrots in grocery stores in the United States are a recent development. Coring carrots was done in the late 1970s in some recipes. Plus, I had some! I had all this stuff, well some of it.

I cut back on the spices a lot. I didn't have enough of everything. If I had, it would be 1.4 ounces of cubeb, 3 ounces of ginger, 3 ounces of long pepper, 3/4 ounce of cloves, 3/4 ounce of cinnamon. Once I saw I didn't have all the spices in that quantity, I decided to wing it. I boiled everything together, brought it to the syrup stage and then strained and bottled it. It is a milder spice, but very good.


Syrup of Tamarind:
Take a ratl of tamarind and steep in five ratls of water, throw away the dregs immediately and add the clarified water to a ratl of sugar. Cook all this until it takes the form of a syrup. Drink two ûqiyas of it in three of cold water. It is beneficial in jaundice, and takes it away easily; it cuts bilious vomit and thirst, awakens the appetite to eat, and takes the bitterness of food out of the mouth.


I had 4 ounces of tamarind. I soaked it in 20 ounces of water in the sun. Then I broke it up with my fingers. That may have been a mistake. The water became about the color of tamarind soda, so I thought it might be about time to drain it. I strained it several times and threw away the pulp. I then measured the liquid and found I had about 18 ounces of water. I added 4 ounces of sugar and simmered it until it became a syrup. The results were pretty to look at but utterly disgusting to taste. It was exceptionally bitter. Four tasters rejected it. I think I am going to adjust the liquid to the sugar ratio and cook it less time. I will also experiment with steeping time. Tamarind syrup in the Philippino store is tasty. I do not think they would intentionally make this, so the redaction must be wrong.

Next up: Mustard!

Wednesday, March 14, 2007

What happened to the Poo Lady??

  • Computer crash including both the main computer and the server
  • Break-up with long-term boyfriend and sorting things out and maybe something is going on there
  • Marine World is still snubbing me
  • Went to the Getty Villa in LA with the Foster Laurel and took 600 pictures
  • Went to DC to the Smith to check out some tapestry stuff
  • Learned to use my babyloc serger, still scared of the big one
  • Sorted 80% of fabric collection
  • Dug back to the other 20% until....
  • Hayfever set in!
  • Spring occurs, which actually means work for farmers
  • Learned to spin in Caid and Foster Laurel's lovely lady Baroness Ghiselaine gave me a better drop spindle. Still practicing. Will buy wool to spin thread for embellishment.
  • Was invited to write articles for Florigeum or however you spell that...still in denial.
  • Found out I am one of a rare few that believe peer like qualities is a serious issue and yes, you shouldn't get a peerage if you don't have them.
  • Realized I picked great laurels and a kick ass knight to guide me
  • Made a cloak out of a piece of fabric I have had for like 12 years
  • Made 1 blue norman dress that supports the breastages
  • Made 1 real linen 10th century Norse underdress using Vigdis' layout. (Beautiful linen, a bit heavy but $2.98 per yard. I have 9 yards left.)
  • Made up the cherry red Norse underdress in only 3 hours using Vigdis' design and 3 yards of linen. I have a good yard left over and may see if there is another yard at the shop for a cherry red apron dress.
  • Made a lavendar (deep lavendar) apron dress
  • Finished penguin pouch and gave it to Greywolfe. He says I can come over any time for job stuff and playing WoW.
  • Made 42 and 19th levels respectively in WoW.
  • Pulled weeds
  • Went on job interviews
  • Car shopping with grandma.
  • Had a funeral for step grandfather type guy.

I was just too swamped to post! I do have loads of pictures and I will get them up as soon as I can.

Friday, January 19, 2007

Fish Trap Research


I first decided to study fish traps a few years ago. They are an integral part of the medieval cycle of fishing life. I was thrilled to see that they were on the competition schedule for Beltane. Technical Science: Mode or recreation of fishing impliments, such as fishing nets, fish spears or fish hooks. I decided traps are included.

I know about fish traps because we used them up until oh.. a year ago. I have eaten trapped fish most of my life. Crawdad traps are very much like the old fish traps I have decided to make. I know the design and I know how to bait it. If I get my fishing license, I could go do it. Hee. If. So, time for research.


These images were found at http://www.le.ac.uk/ulas/annualreports/ar99-00/hemington/hemington.html


Perhaps the most amazing discovery was a large wicker fish trap positioned at the apex. The trap was a cone-shaped basket over 2m long with two internal funnels (non-return valves), the size and arrangement suggesting that it was a silver eel trap. Fragments of another similar basket were found nearby lying on top of the weir.


They have excavated a fish weir which was a medieval structure designed to create a fishing area. It was about 75 yards long and created an artificial environment out of rocks and wattle. Medieval fisheries were a huge economic concern because of the amount of fasting days.


Wikipedia says:
The Magna Carta includes a clause requiring that they be removed:
All fish-weirs shall be removed from the Thames, the Medway, and throughout the whole of England, except on the sea coast.[18]

Basket weir fish traps were widely used in ancient times. They are shown in medieval illustrations and surviving examples have been found. Basket weirs are about 2 m long and comprise two wicker cones, one inside the other -- easy to get into and hard to get out.[19]

That isn't really true. They aren't wicker cones. It is really a valve inside a cone. But two cones inside each other is easier for some people to grasp. Regia.org has the *best* stuff because they care about medieval things.


It is likely that the trap was flat bottomed to allow it to lie on the river or sea bed without rolling with the current or tide. For eels it would need to be baited with a dead fish, this would attract the carnivorous eel into the funnel and once inside, they would find it difficult to escape. Single chambered traps may also have been used by the early medieval fisherman; these would have been something akin to the salmon putchers used earlier this century in Scotland and on the Severn River. The main advantage of these traps was that smaller fish could be caught, there was little danger of the fish swimming away from them as in the case with a net and they were relatively easy to maintain.

The traps themselves would be made from willow 'withies' that had been cultivated for at least three years. Today there are withy beds in the Southwest that produce willow withies in white, buff and brown. White withies are produced by stripping the bark away, the buff has been boiled with its bark on and then the bark then removed and the browns are the withies complete with bark. In the early medieval period the majority of the basket work was functional and there was no need to add extra work to the making of fish traps and baskets: brown withies would have been the most common. To weave the withies they would need to be soaked so as to make them pliable, they would need to be left to soak overnight to enable the surface water to penetrate to the pith of each withy.

Ha! My laurel taught me this withy stuff. I am also downloading the Rule of St. Benedict so that I can see if he really reflects on this stuff.


Dark Age fish-traps
The number of early medieval fish-traps known in Britain is increasing. In Essex, a series of large, timber fish-traps around the coastline were long regarded as medieval, but two have now produced mid-Saxon radiocarbon dates of the 7th–9th centuries. The traps are in the Blackwater Estuary and near Bradwell-on-Sea.

Meanwhile, up the Thames in London, a mid-Saxon ‘wharf’ originally thought to be part of King Offa’s palace at Chelsea, and given wide national publicity last year (see BA, September), has on further examination been re-interpreted – as yet another Saxon fish-trap.

Essex Archaeology, an annual round-up of archaeological news from Essex, is now available free from the county council’s archaeology section (send an A4 SAE). From British Archeology: Issue 31 in February 1998. I need to get that.


Thursday, January 18, 2007

Thwarted!

Marine World hasn't returned my calls. I need to find a camel poop soon!

Friday, January 05, 2007

Camel Poo

In the course of my research, I have found camel poo may have been used for bead slip when doing lampwork. I need a bit of camel poo. I need enough to make slip of different consistencies and see if I can make a bead slip. What to do?

Marine World Six Flags has camel rides. I bet they have camel poo. Tomorrow, I call and see if I can talk to the camel trainer.

Saturday, December 30, 2006

Bags!

Shhhhhh....

I don't think he looks and it is almost done. I am doing a bag for a friend. Today, I incised the leather and stained it a bit. I ran out of brown dye as my dye had tipped over in the storage container. I am glad I am using plastic storage containers now.

The first thing I did was make the basics of the pouch. I could get pretty far without carving the image. I created a simple pattern and cut the pieces out. I found there were a few ways people were doing these but I haven't found any local museums that might have something I need in their catalog. I am going to see if I can do that later on today.

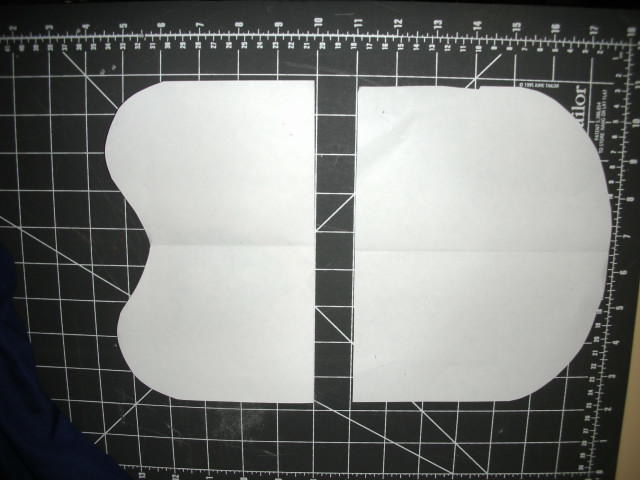
like the one I made for Beccabutt's Heraldry Flash Card Set. IThe pattern is simple. It is a kidney bag, much created a prototype of the pouch so she could work with her flash cards and carry them around with her. You might as well get *something* for learning to be a herald. Thank goodness I found someone to foist it off on. I am thrilled to go back to simple yelling and looking up names. Anyhow, I started with a basic kidney pattern. Notice the two pieces of paper? Ok, for the top of the pouch you put both together and cut that. For the bottom, just the rectangle. I also added about 2 inches between the two pattern pieces on this pouch because I plan on adding a strip of leather to make the pouch roomy.

The leather is a light, vegetable tanned hide. I got it from a local supplier and got a half way decent, cheap half. I think this is 8-9 ounce leather. I cut the pieces and even put the rivets in the back of the top layer. I used solid copper rivets because I know how to pound them over and they look spiffy to me. I am not fond of pop rivets because I made my own armor. Those rivets fall off all the time.


The next step is to make a cartoon. I am going to show you the steps with the West Kingdom Populace badge.

I blew the drawing up on my computer and printed it out. I took another piece of paper over the top, taped it to my window and then traced just the outline. Here is a version with the West Kingdom populace badge. You can see the tracing on the window. I don't have a light box. I have a great window with a kick butt view. Anyhow, I taped it up to the window and traced the outline.


Notice that I didn't do a lot of detail. Too much detail might have pulled away from my final image. I will be painting the image part after the pouch is dry. With more detailed drawings, I make the cartoon part a lot less detailed than the original drawing. All of my details and shading can be done with tools or paint.

So, here is the West Kingdom demi sun!


The next step is easy. You just get the leather damp. You want somewhere between damp and wet. I take a clean rag and dampen it with very warm water. I gently wring it so that it is not drippy. Then I brush the leather once, twice, three times. You will see three distinct color changes in the wet leather. I find that the third color change is perfect for my hand. Your mileage may differ. When the leather is wet, secure the cartoon onto the damp leather with tape or clamps. Then take a fine, blunt object and trace your design. I have a stylus now that I got for a dollar at a craft store. I have usually used ball point pens that have run out of ink. Don't use one with ink because sometimes you draw through the paper as it gets a little damp. Oh and use heavy paper to transfer the design. Good quality printer paper is perfect.


When your design is transfered on, remove the cartoon and look for touch up areas to clean it up for the next process. Notice the leather is still a bit wet? Once the transfer is complete, you can take a break. I wouldn't advise it if you haven't gotten the whole transfer done as things jostle. I hate tracing a design and having it off center a bit. Plus, you end up having to rewet things and start over. So, now is the time to take a break if you need one.


Once your cartoon is on the leather, you can gently carve it. I use an exacto knife. I prefer the heavier one. It doesn't skip around in my hand like a lighter one. You can also use a swivle knife that is made for leather or a razor blade or sharp knife. Just drag the blade with a light and level pressure. Do not cut through the leather. You are just scoring the surface. I went a tad too deep here.


Here is a shot of me tooling a bit of the design. I learned how to do this by using the end of a nail. Use the flat end to create a flat planer. I do both sides of each cut. You may need to rewet the leather to get it to bevel. That is what you are doing here, just beveling the carving.


It takes a bit to level each cut out. Don't worry if they are not pretty and perfect . I just start lightening the pressure.

Everything looks icky and dented in this picture, and it was. The good thing is that the tools smooth the skin gently as you go.


Below is the finished design for my new trifold pouch!


Thursday, December 28, 2006

Eeep


Sorry about the delay in posting. I will post the Christmas post for Susan later tonight. She needs to see the clean sewing area!


The collar is mostly done. The bag is mostly done. I had a personal issue that sucked up a huge amount of my time. There will be pictures over the next few days, including some of my bistre.

Tuesday, December 19, 2006

Avoiding!


I don't know what it is, but I have never been fond of doing split stitch. Plus, my embroidery is not nearly as good as it was in my 20s. I know more now, but my eyes are going and I can feel it. Hee. I am old and shall do leather work! Anyhow, this is the collar for the bliaut.

When I originally did the design, I really liked it. It was a combination of simple and flashy. I took it off of a couple of manuscripts. I did not like the way they combined and set it aside for a few days. Then I started working on the dots. They are two different sizes which is a little unusual and why I chose this design. If I were to do it again, I think I would a more eclesiastical look. I think this collar will stay on the dress for a while and then be retired to a t-tunic. This is another example of the process of making mistakes.


I am definitely more fond of it now. I am trying to keep in mind I have not embroidered for nearly 6 years. My stitch tension is good but my attention to detail is not, and I am going to need this when I work on this dress. I am going to finishe the collar, get another bit of that silk/linen blend for the collar and leave the sleeves plain for now. Let's see how I feel about it when it is done. I am feeling a strong tug to redo the piece in wool or a paisley leaf pattern I found in another drawing.

Saturday, December 16, 2006

FINI!!!


I did it! I finished the pouch.

I really like it. Really! It is fabulous. It isn't period and I am not going to pretend it is at the level I want things to be at. But, it is so cute! It turned out just like it was in my head. I also got to use some of the Norse dragon buttons I got several 12th Nights ago. I was in line waiting and a woman introduced herself. Her name was Diana Listmaker. What a silly name! She was very nice. This pouch was born with a story of how I met her.

Friday, December 15, 2006

Progress So Far


What do you think? Should the running stitch go on the straps too? I am inclined not to add running stitch in red on it. So far, I really like it.


Wednesday, December 13, 2006

Alms bag?

I started working on an alms bag. It definitely is smaller than what I wanted.

I needed a leather bag to carry my stuff in if I am not going to be wearing a belt. Alms bags seem to be the right thing. I thought about a cute little embroidered number. I am very hard on my clothes. I am as attentive to my clothing as an average 8 year old boy playing in a creek. What the heck. I have to stay busy and I need something that does look period.

I have decided what I really need is a good bag to wear all the time and a bigger and more organized bag for small crafts and things you always need at events. I also want to make a new feast bag. I liked my feast bag better than a basket because it was 100% washable and it was perfect to throw dirty dishes in.

Back to the alms bag. I wanted to use black leather and red linen. I have a cherry red linen that has a weight of 7.1 ounces per yard. I am going to be using that for a nice viking underdress. I thought the alms bag would be great as a later project. You know, after I made the dress. I couldn't wait. I cut off a fat quarter to work with. I have been studying lots of pictures and I was looking for a leather bag. I have zero documentation on this style in leather. There are serveral extant pieces that are silk or linen with embroidery in this general shape. This is a perioid piece as far as I know.

I drew out the design on some taped together pieces of printer paper. I drew a back with a lid and a front. This was a stupid mistake. In my first illustration, you can see that I cut the back and the front as two seperate pieces. When I looked again at the illustrations, I realized I would not get the crisp, perfectly pointed corners on the bag. The second illustration is how I should have cut the bag. It is the way I will do the next one.

I cut one piece out of red linen and one out of black garment leather. I then sewed up the linen as a lining and the leather as the outer. Then I ripped it out. What the heck. This was going to be flashy perioid piece and not something great because I already made it too small, out of leather and I messed up the design. I sewed each lining to each leather piece instead. I had an idea.

After sewing them, I pressed them and then sewed the bottoms together. The design may be wrong but it won't be horrible. Notice that the sides are not sewn together? That is because I am going to sew the sides together with red thread for a more striking effect.

It turned out just about the way I envisioned it so far. At this point I am pleased with the effect. The strap is externally attached with room for pilgrim's badges. I have stashed away a few so I am very excited about sewing them onto the bag.


This is what it looks like folded over? See that weird thing on the bag? It is a pewter wreath of roses. I think it used to be on a scented candle holder. The candle holder broke a few years ago and I haven't thrown away that pewter thing. It is one of those things you constantly find in your junk drawer and go 'wtf? What is that and why do I have it?' I stuck it on the bag because for some strange reason, that thing had migrated onto my desk. Obviously, that muse of freaky SCA projects is busy reorganizing my house.

Friday, November 24, 2006

I haven't been blogging

But, I have been working. I am sorting fabric and just did a bunch of heraldry stuff. I went to the meeting and I went to the collegium. I took Aurelia, my deputy with me. Two Aurelias! Ha! What is the world coming to? I have been knee deep in research and heraldry.


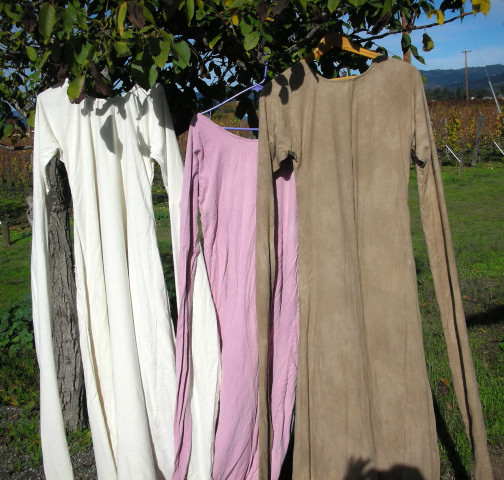
I have sewn up everything but the hems on the three dresses. Here are some pictures of them outside under the walnut tree. I really like the flow of the walnut dyed dress on the far right. On the far left is the plain, natural silk. The pattern is my own. I have included a rough bitmap but I don't think it is a very good drawing. It is a pretty basic tunic with gores.


I think many folks in SCA use a similar tunic design for the under dress. What is extant is mostly just little fragments of weave or trim. Trim helps keep fabric. People are apt to cut off the end of a sleeve and stick it in a trunk for later use. It has given me a few ideas on what is extant and what is not. We keep preaching this 'there is no extant 12th century garb' but there are a few rare pieces and loads of fragments. You can tell a lot from a fragment. One thing I have learned from patterning is that no two people do it exactly the same way. The big thing is achieving the look you want. If you have that planned out in advance, you won't have serious issues.

One thing we have not found with extant pieces is the curved armpit as in my pattern. Extant pieces tend to have diagonal gores or triangles in the armpit. That could easily be done on this cutting diagram by taking the triangular gore out of the corner between the sleeve extensions and the armpit. Squaring off the arm of the dress would be valuable too. Why didn't I do this? I like to take advantage of the bias of the fabric. That kind of stretchiness allows me to wear the same dress, fighting or not. My latissimus dorsi muscle tends to change shape when I am fighting. This has caused me problems in the past. I will make garb and it won't fit because of the muscle. That happened to me during my "Year of the Norse" clothing scare. 8 dresses, two of which still fit.
The sleeves are plenty long and it seems I can get on with lining the cloak and making the over dress. I have been very intersted in doing sleeve treatments from Chartres on my aqua silk, but I am not sure which ones to do. I had better get on it soon.
Saturday, November 11, 2006

accessories!

In my quest to be more period, I have been working on some accessories for my costumes. I picked up a bunch of garment leather to do details on various projects, but it was also cheaper than the half hide I bought. I can use the garment leather to make patterns, much like a dressmaker would use muslin. I know I need a tough, leather bag for my every day items. I plan on making an alms bag for money. What is the difference?

Wallets, pouches and purses were used for personal items. It all depends on the time period, where you are going and what your social class is, of course. I am a French Courtier or a nun, depending on how old I feel that day. I have finally decided. There are days when a Dominican Habit and the 13th century do not fit. It is then when you are a 12th century French Courtier. (Not courtesan. I am merely a minor hanger-0n in court.)

I found an interesting 12th century bag for sale that featured a kidney shaped flap. You can see them at http://www.by-the-sword.com/acatalog/images/gh0055.jpg or at http://www.jekylthehidesmith.com/12thCenturyWallets.htm for reference. The picture is lifted from jekylthehidsmith.com but I am giving them a plug. I found a couple of original examples that I am having a devil of a time finding again. It seems that in leather, the bag with the kidney shaped flap was the stylish thing to wear. Fancy alms bags were a must. I will need both. I am also an organization freak so I will be adding tiny wallets for things like money, contacts, medical info and my cell phone (which will be on vibrate at vents.)


I started by creating an outline. It seemed like the illumination pages and the extant pieces did not have a base like we find in a modern purse. These were wallety-pouches. They generally have a strap with a buckle closure or a beaded tie. Some were one points to attach to the belt and some were two. I really prefer the two as is shown in the jekyl piece, but most of the drawings I found were single straps. I wrote the purveyors to see if they had an idea of where they got the design.

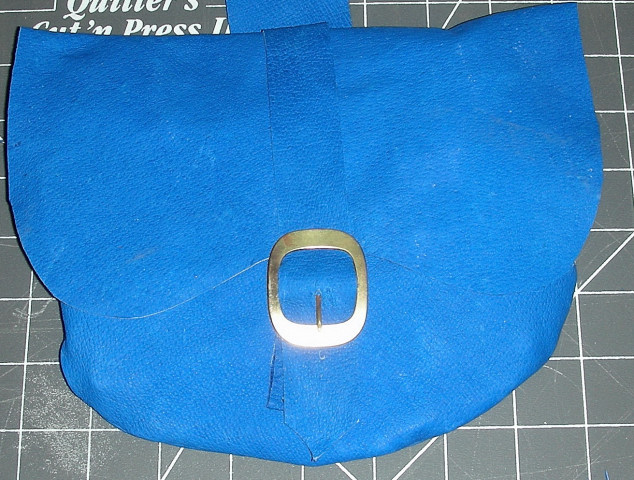
My first try was going to be a single point with a simple buckle closure since I have a gazillion buckles left over from the boxes of buttons. I pulled out a brass one that I figured I could live without and that looks period. I took some polish to it and cleaned it up and wow, it looks great. Huzzah for recycling. I basically whipped it up to see how the thing would look if I were to make another. The blue on blue is tough to photograph.

What would I do differently? I would edge the flap. I would also line the final version. I think two points are necessary with this weight leather. I would do a final version of a more durable leather. I would also double over and edge stitch the straps. I also did a curved bottom which is kind of silly. I didn't see examples of that. I think outside stitching or a pounded folded edge seam would be more fun too. All in all, the pattern is only about 1/2 inch off. Of course, if I were smart I would just buy one.

Tuesday, November 07, 2006

Christmas...

I have a huge case of the I wants today.

Aureelia's Christmas List:

My own bottle capper.
Some wood.
A new shield (GREGGIE!)

Anything on this page:
http://www.revivalclothing.com/catpages/talbot/tal_buckles.htm


Books I need (or think I need.):

Blood Red Roses: The Archaeology of a mass grave from the Battle of Towton AD 1461 (Hardcover) by Anthea Boylston (Editor), Christopher Knusel (Editor), Veronica Fiorato


More to come...

Three Colors


Well, not as happy as I had hoped. You can see differences. I think we know now that I will never be a professional. THEY AREN'T SUPPOSED TO BE PALE! I am doing something wrong. I have to do more research. Oh, it looks so easy on paper, doesn't it?

Left to right: Walnut with Alum mordant on silk, plain raw silk, fermented cochineal on silk.

Still, they aren't suckage. The walnut is a pretty color. I do like it. It would look smashing under a green or gold wool dress. I have a lot of sewing to do and a lot of thinking over how to get all of this a great deal darker than it is.

Monday, November 06, 2006

kirtle


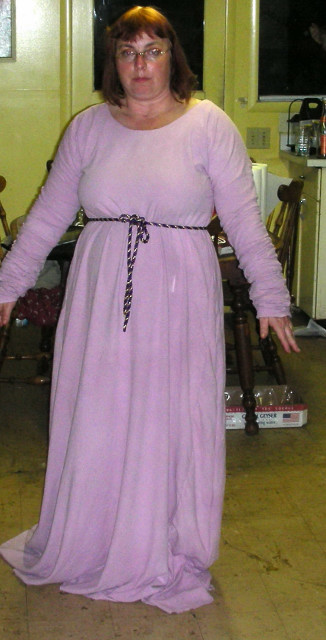
Dear God I am fat! Whoa, those things in the front are falling fast. Remind me to wear a bra. It never hits you until times like this, does it? I am getting broader by the year. Yeesh. Hey, but that can be fixed.

Let's look at the kirtle. It is 100% silk, dyed for 2 hours in fermented cochineal. The mordant was alum. This can go under a cote or a bliaut. The color does show up in a few illuminations, but I am going to check with Master James. I think they are faded.

The length is good and the arms rauched a lot. HUGE amounts. Maybe too much. I think it is just a tad too bulky. Here is an arm shot. All the seams are frenched and except for a tiny part under the armpits, they are perfect. The tightness around the arms is weird, but I think I can live with it.


Maybe I should trim them? What do you think?

The color in the top picture is more realistic to what the dress looks like. It is a sort of raspberry. This sleeve picture is over exposed and I lightened it so you can see how much is bunched up on my forearm.

Walnuts


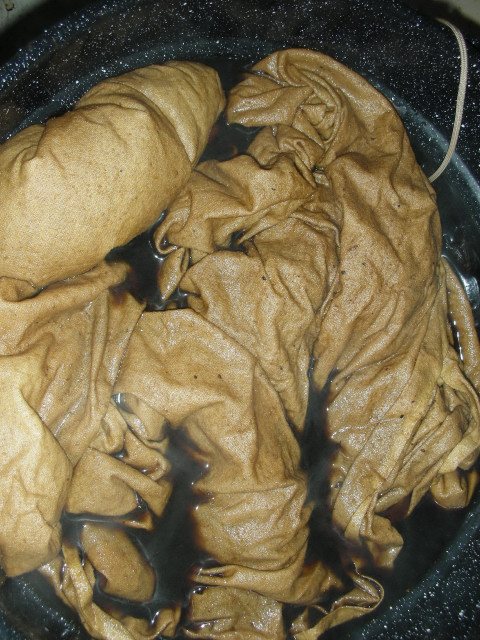
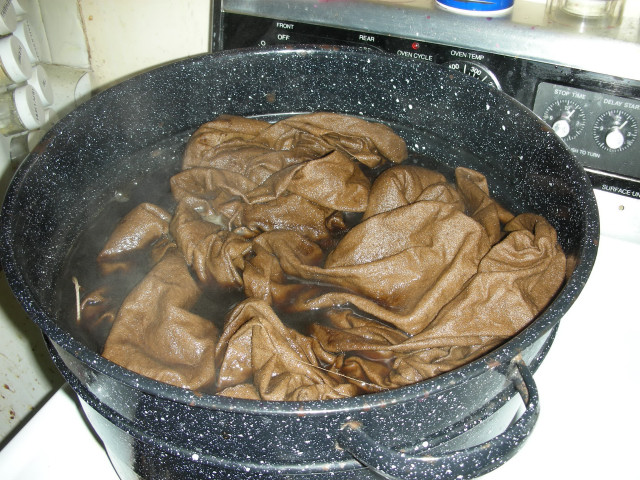
I began the walnut dye a few days ago. I steeped the hulls three days, until it was a whimpy coffee color. I then strained the mixture and peeled off the hulls and boiled them for 2 hours. The dye vat took on a murky coffee color, or deep roasted bone beef stock. This is the silk right after I turned it. It has been in 5 minutes.

In the meantime, I boiled five yards of silk with an alum mordant solution. I am told this will be more mahogany. Dying looks much easier on the page that it is in reality. I love this part of the research because I find so many things are NOT things you can simply follow the instructions on and have it come out perfect each time. I am turning the cloth every fifteen minutes as it boils away in the vat. It is actually at a very slow simmer and I keep a polyester net bag full of hulls in there to deepen the color.

In the meantime, it is lampwork, stewing the dried and recently fermented cochineal to see if it can do red or once fermented always mulberry, cutting out the plain silk kirtle and sewing up the pink kirtle. I have learned my french seams and I believe good material helps you learn. Silk needs the added seams. It prevents it from raveling. Now, the neckline is a problem I am not quite sure what to do. The various instructions seem at odds and it is hard to french. So, I do it my way. Go me. This is the kirtle or under dress.

Oh! It has been an hour.
How about a picture on our progress with that dye vat? It is darker, but not nearly as much as I wanted. I am disappointed. Why isn't it super brown?? This is silk! It should be dying a very dark color. It isn't bad though, is it? This is probably the final color and it isn't awful by any means.

I will go back to pinning the pink kirtle.

Bumpy beads


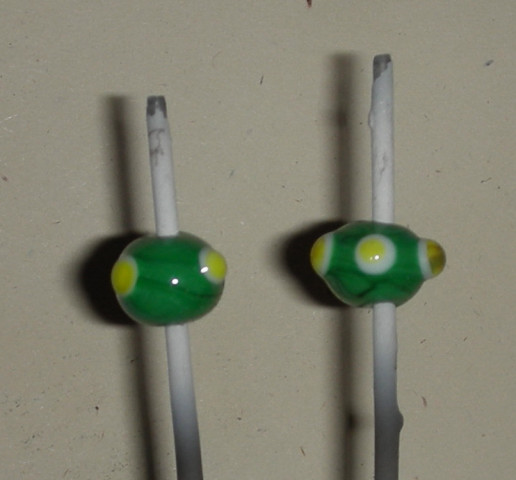
This is my first try at raised bumps. I still have control issues and need practice, but my cousin Jeffy has gladly taken all my old beads off my hands. I am doing custom beads for her for Christmas. It is a fun idea because she can motivate me to do what suits her, which is also a direction for me to practice.

The evil eye project is basically done. I am going to do a couple of bracelets so I will be making more evil eye beads, but not right now. I really need to learn and perfect dot techniques of all sorts and raised bumps are a big deal.

I am also on the search for nice wool and lining for my new clothing. The kirtles are coming along nicely and I should have pictures up later. I am going to french the seams, but only because it is good when working with silk.

Sunday, November 05, 2006

Pink Tunic


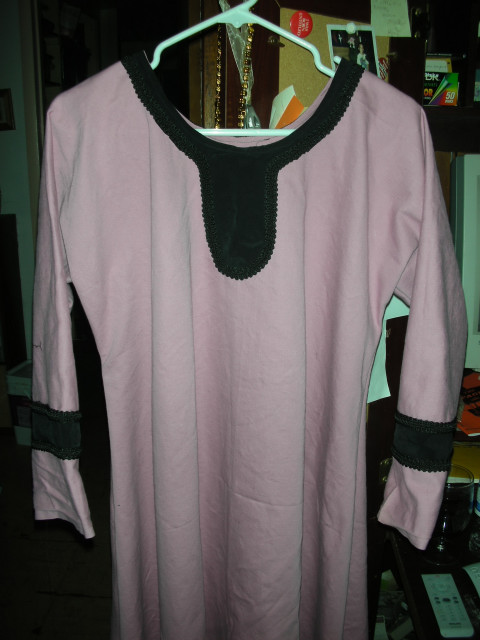
Eh.. well this is another thing that will end up in Gold Key. The good thing? I used a bunch of scraps except for the trim. The black is a washed silk twill bordered with a black braid. The tunic is sportswear so it will be perfect to loan, when I get to that point. It will be sturdy and wash well in cold water.

It is nice and uniform. The washed silk came from a skirt that I tore the gusset on a few years ago. I stashed it to use for trim. I did the same with a pair of dark jade green pants. I plan on using them later but with a linen dress I have in mind. It kept me out of trouble!

On another note, I gave all my old lampwork beads to my cousin Jennifer. She has ideas and I am going to make the beads and give them to her. Then, she can order what she wants. She wants green, blue and red cubes. They will be very small. She also wants some beads with texture. It was nice because everything she wanted was period.